
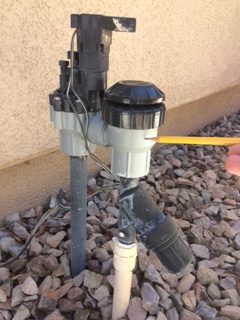
Does water leak out of the top of your anti-syphon irrigation valve when it is on? See photos below of a typical valve.
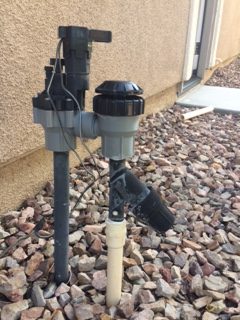
Our SCSH homes were originally equipped with two Rain Bird irrigation valves. One each for the front and back yards. Each valve is referred to as a station and they are operated by the irrigation controller/timer, originally installed outside on the garage wall.
If your home has the original or like-kind Rain Bird irrigation valves you may find that the large, black cap is leaking water when the valve is on and watering your lawn or other plants. Photo 1 shows a typical valve; the pencil pointing to the anti-syphon chamber and the black cap. Water leaking from this area is a common occurrence. Many times, the fix is simple, economical, and effective without needing to pay someone to make a costly valve replacement.
Just follow these easy steps. (It may require a trip to the plumbing store):
- Turn your irrigation controller (timer) to the off position.
- Unscrew the large black, dome-shaped cap on the top of the anti-syphon chamber.
- Inside the cap is a large “O” ring or washer. As the washer ages it can allow water to bypass and leak.
- Two steps you can try before heading to the plumbing store are:
- If you have water-resistant marine grease apply a small amount to both sides of the washer.
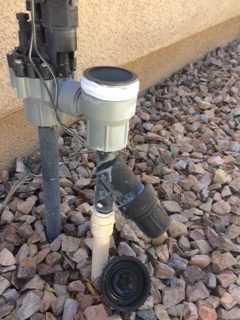
- If you have plumbers tape wrap it snuggly around the threads of the chamber in a clockwise direction (photo 2).
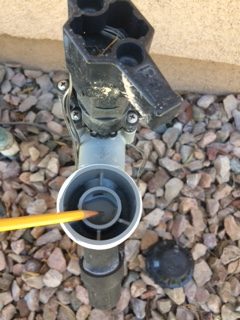
(Note: While you have the cap off observe the water level in the inner chamber (photo 3). If water continuously rises and flows out of the inner chamber it is an indication the valve is leaking and may need to be replaced.)
- Replace the cap snuggly onto the chamber with hand pressure.
- Turn the controller to manual and start the system watering. If the valve you just repaired does not come on advance the controller until that valve/station comes on. Observe the anti-syphon valve for a few minutes to confirm whether your repair stopped the leak.
- If water is still leaking after the above steps take the cap and washer to a plumbing supply store so they can confirm the part and sell you a new one. Be sure to turn the controller to the off position while you have the cap off. Smith Pipe and Supply Co. in Indio sells new caps and washers for about $10. The big box hardware stores do not typically sell this valve part. You may want to buy two caps while you are there!
- When you return home, with your controller still in the off position, install the new cap and washer and restart your system as in Step 5.
- While a new cap generally stops a leak in this part of the valve assembly, if it fails to do so you probably need a whole new valve. A new valve of the same make and model will cost about $30 and the labor to remove the old one and install the new one could cost another $50 or more, depending on the billing rate of your contractor.

Produced by SCSH resident and member of the SCSH Desert Gardeners Club, Corey Unfried, 541-206-1329. Not a licensed contractor but a descent do-it-yourselfer always willing to help where he is capable!